
By Cameron Soran
This article is being reposted here after originally finding it’s home at riley-kolste football. If you enjoy Cameron’s detailed breakdowns of playbooks and coverage, his book is a must have!
Nick Saban’s success as defensively-minded head coach at Alabama is almost unparalleled. An official record of 218-62-1. Eleven SEC West titles. And, of course, six national championships. But perhaps what is equally impressive about his tenure at Alabama that his defenses have been consistently regarded as, if not the best, then at least top-5 in the country for ten straight seasons. It seems that no matter how many of players he loses to the draft or graduation, there is almost no drop off for the Alabama defense from one season to the next. And by all accounts, his defensive system has essentially remained unchanged during that time. So I think it is a worthwhile measure to at least figure out what they are doing in Tuscaloosa that seems to be working.
Before we begin, I want to make a few notes. First, I will not be covering every coverage or check Nick Saban has at his disposal in this article. For one thing, many of his individual checks are for highly specialized situations, such as a specific coverage for when the offense lines up with 3 wide receivers to one side and 1 tight end to the other. I may cover those later, but this article is intended about 90% of what you will see Alabama run on Saturdays. For another, Saban runs certain coverage checks depending on his game plan that will vary from week to week. Not being affiliated with – let alone a member of – Alabama’s defensive staff, there is simply no way for me to gain access to all of that information.
Next, I should define a few terms that I will be using when breaking down pass coverages.
First is the term Apex, which is the first underneath defender inside the cornerback. This can be the nickel, a linebacker, safety that has rotated down, etc. The point is that the Apex is generally responsible for the #2 receiver (second eligible receiver – TE or WR – from the outside in). I use the term Apex because a lot of the same coverages will be the same regardless of who is playing the Apex position, whether it be a linebacker, safety, Star, or Money.
Second is the term Hook, which is the second underneath defender inside the cornerback. This is most commonly a linebacker, but can be a Money player or a safety rotated down into the box. Again, the point is that a Hook player tends to have run-first responsibility and is generally keying the running back in 2×2 sets.
This means that in all 1-high coverages there are two Apex and two Hook players.

In split safety coverages, by contrast, there are two Apex players and only one Hook player.

Again, the purpose of these definitions is minimize confusion regarding personnel. So when I say that the strong Hook player in Cover 3 has such-and-such assignment, it applies to whoever is playing the strong Hook, whether he is a linebacker, Money, or safety.
With that primer, let’s begin with Saban’s one-high coverages.
One-High Coverages Generally
There are three constants to all of Saban’s single-high coverages.
First, all of Saban’s one-high coverages, the defense will align initially in a two-high look. As the quarterback starts the snap count if under center or put his hands out for the ball while in shotgun, the safeties will rotate to their assigned positions. Most of the time, this means that the safeties will be about halfway into position by the time the ball is snapped. The purpose of this late rotation is less about disguising the coverage as it is about denying the offense the time to audible upon seeing a single-high safety look.

Second, the middle of the field safety’s assignment remains essentially unchanged. The free safety is assigned to cover an area that runs from 6 yards outside the hashmarks to each side, and starting at about 15 yards deep. His initial drop will be to a point about fifteen yards deep, and will continue dropping further based on the release of the #2 receivers in 2×2 sets and the #2 and #3 receivers in 3×1 sets. At bottom, the free safety’s primary goal is to deny all seam routes that might threaten his assigned area. His secondary goal is to deny post routes that enter his area, but never at the expense of the first goal. While he is dropping, the free safety will eye his key.
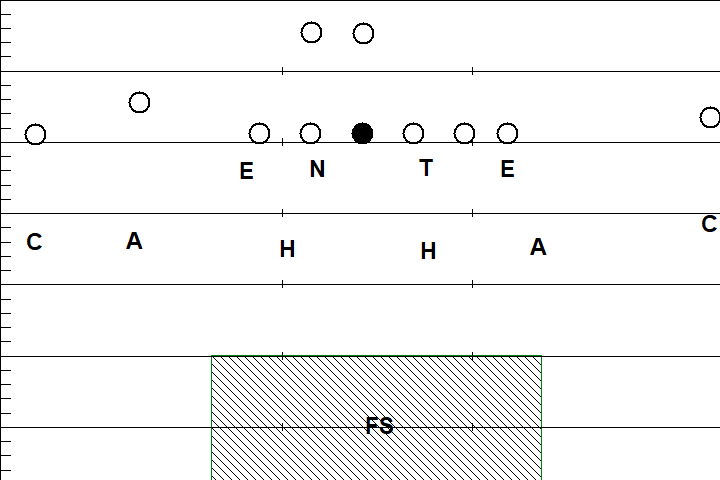
So he eyeing the releases of both #2s in 2×2, or #2 and #3 in 3×1, because in order to defend that area, you have to first guard against seam routes. Then, only if there are no seam routes, defend against the post. The free safety is not to look at the quarterback until he has identified those receivers releases. Quarterbacks are trying to fool you early anyway, so there’s no point at looking at him at the start.
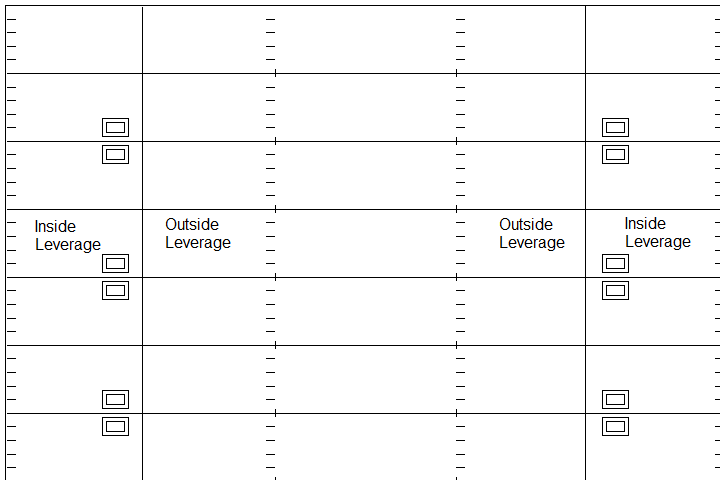
Third and finally is the concept of position maintenance. In all single-high coverages, the corners have help inside against any route by the #1 receiver. So if the #1 heads inside, the corner should maintain outside leverage since he has help inside. If the #1 heads outside, however, the corner should maintain inside leverage on the #1 since he has no help outside (other than the sideline). Therefore, Saban tell his corners that the line of demarcation is one-yard inside the top of the numbers (10 yards from the sideline). If the #1 is outside this line, then the corner should maintain inside leverage. If the #1 is inside this line, then the corner should maintain outside leverage.
Cover 1
Cover 1 (or simply “1”) is Saban’s term for what most coaches call Cover 1 Robber. There will be one deep safety and one player in the hook area – the Rat – eyeing the quarterback and robbing any routes over the middle. If the quarterback scrambles, then the Rat will mirror the quarterback horizontally in the hook zone until the quarterback crosses the line of scrimmage; only once the quarterback has crossed the line of scrimmage will the Rat play run responsibility.
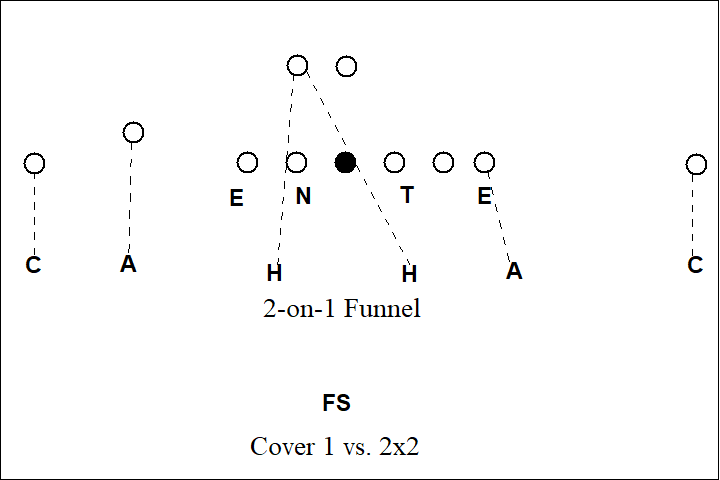
Saban does not, however, typically designate a Rat in 1. Rather, in all one-back sets, he uses what he calls a Funnel concept. Funnel means that two players will eye the running back, and the near side player will take the running back if he breaks to one side. The opposite side player will become the Rat. So if the running back goes to the right, then the right Funnel player will take the running back, and the left Funnel player will become the Rat. Funnel serves two purposes. First, it ensures the nearest linebacker will have responsibility for the running back, who is commonly faster than their linebacker counterpart. Having the far side linebacker, for example, try to get across and match the back is only inviting disaster. Second, it increases the likelihood the Rat player is dropping from the side the quarterback isn’t looking post-snap. Most offenses like to use half-field reads with the running back as the third option. By having the Rat come from the backside increases the likelihood the quarterback will not see him while reading a front side on a dig or other crossing route.
- Cover 1 versus 2×2:
- Cornerbacks will man on #1
- Apex players will man on #2 with outside leverage
- Hook players will Funnel
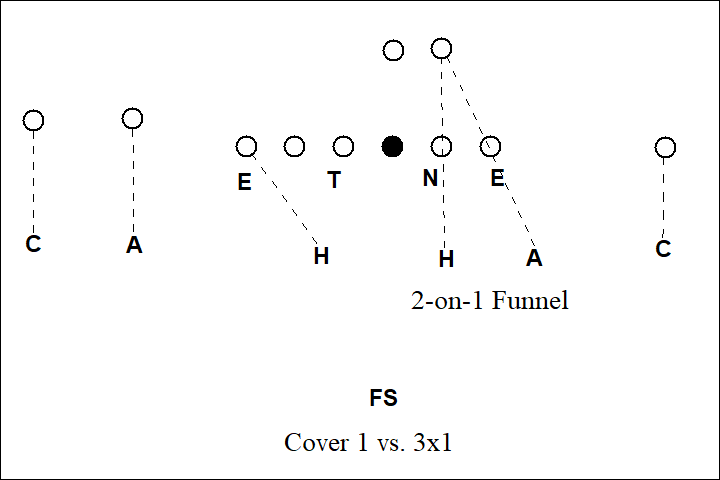
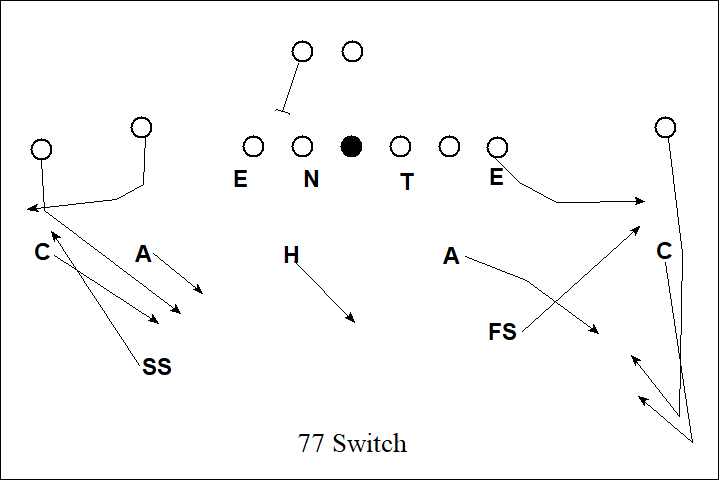
- Cover 1 versus 3×1:
- Corners will man on #1
- Strong Apex player will man on #2 with outside leverage
- Strong Hook player will man on #3 with outside leverage
- Weak Hook and Weak Apex will Funnel
Saban runs five main versions of Cover 1.
1 Invert – 1 Invert is Cover 1 with the safety to the tight end (or second slot receiver, if there is no tight end) comes down to play the Apex to that side.
1 Funnel – 1 Funnel is Cover 1 with the safety to the tight end (or second slot receiver, if there is no tight end) comes down to play the Hook to that side.
1 Clue – 1 Clue is Cover 1 with safety opposite the RB comes down to play Hook opposite the running back side.
1 Cross – 1 Cross is Cover 1 with safety opposite the RB comes down at plays robber at the sticks (yard line needed for a first down).
1 Alert – 1 Alert is Cover 1 with safety to the fullback flow side comes down and become the Apex. Fullback includes H-back that is inside the tackle. For example, if the fullback starts to the left and comes across to the right, then the right safety will come down to play the Apex to that side.
Cover 3/6
Cover 3 and Cover 6 (or simply “3” or “6”) is Saban’s term for, you guessed it, Cover 3. For Saban, Cover 3 denotes when the safety is coming down TO the passing strength of the offense. Cover 6 is when the safety is coming down AWAY from passing strength of the offense. Otherwise, Cover 3 and Cover 6 are the same. It is a pattern-matching form of Cover 3 that prior to his association with Belichick with the Browns in the early 1990s simply did not exist. While it has become so popularized at all levels today that it is almost taken for granted, it is important to remember that a pattern-matching Cover 3 is relatively new invention (football-wise).
Rip/Liz is the safety’s declaration to everyone else to let them know which side he is coming down, so that they can bump their alignment away accordingly. The safety declares this because, like in Cover 1, the safety can come down to the Strong Apex, Weak Apex, Strong Hook, and Weak Hook.
Let’s break down the rules first before getting into individual coverages.
- Cover 3/6 vs 2×2
- Cornerbacks – They are man on #1 unless #1 goes under (inside and short) in the first 5 yards. If #1 does go under in the first 5 yards, then the cornerback will yell “Under! Under!” and zones off to deep third, eyeing #2.
- Apex – They are man on #2 unless #2 goes under (inside and short) in the first 5 yards. If #2 does go under in the first 5 yards, then the Apex will yell “Under! Under!” and zones off to the curl, looking to rob #1. The Apex player will only drop to the #3 if he cannot help on #1 (e.g., fade route) or if the quarterback is in the process of throwing to #3.
- Hook – They are the only zone(ish) players. They will eye the releases of both #1 and #2 to their side as they begin to drop to a spot about 10 yards inside of the #2. If both #1 and #2 are vertical, then the Hook players have any #3 to their side. Otherwise, the Hook players will defend the Hook area, protecting from deep to short. Only if there is nothing in the deep Hook area will they come up on any crossing routes.
The above can be a lot to take in, so let’s look at a few examples.
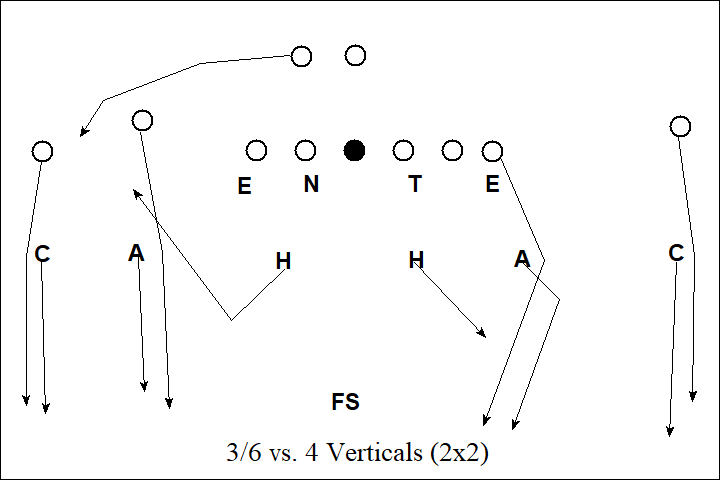
Here, the offense is running four verticals. The corners match #1 vertical, and the Apex players match #2 vertical. The Hook player to the running back side starts his drop, and only upon seeing #1 and #2 go vertical does he break on the back. The opposite Hook player stays in his drop.
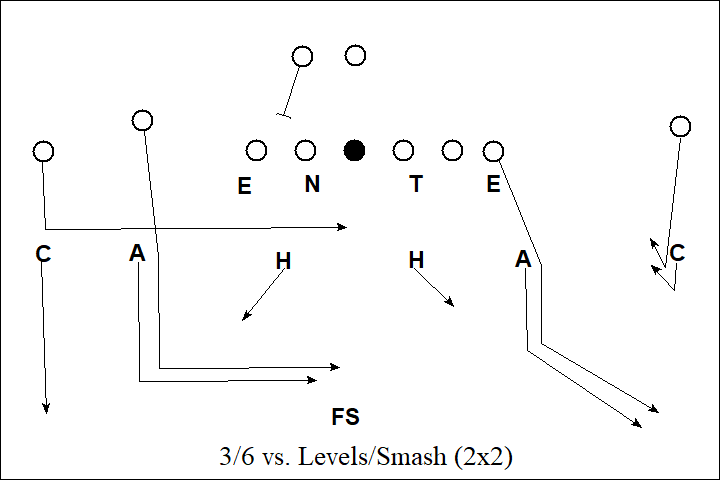
Here, the strong side corner is bailing because #1 is under, while the strong Apex matches #2. By contrast, the weak corner matches #1 on a hitch route, and the Apex takes #2 on his corner/flag route. The Hook players work to defend the hook area.

Here, the strong corner and Apex match #1 and #2 respectively. On the opposite side, the weak corner matches #1. Since the tight end is under, the weak Apex works to rob the curl of #1. Again, the Hook players work to defend the hook area.
While Saban’s pattern matching Cover 3 has gained a great deal of popularity versus 2×2 sets, his adaptation for 3×1 has fewer followers. Most coaches, not without good reason, would prefer their rules for Cover 3 against 2×2 sets mirror those against 3×1 sets as much as possible. For example, one could simply ask the strong Hook player in 3×1 to take all #3 except when #3 goes under, make some rule for when you want the weak Apex to take the running back weak, and be pretty much set. That, however, is not what Saban does.
Ever the maximalist, Saban has another set of coverage rules for 3×1 sets while in Cover 3/6. Saban has two terms for his Cover 3/6 adjustment to 3×1 sets, but to be clear: the assignments are the same. “Mable” means that the safety is dropping down to the passing strength (Strong Apex or Strong Hook). “Skate” means the safety is dropping down away from the passing strength (Weak Apex or Weak Hook). Otherwise, Mable and Skate are the same.
- Cover 3/6 vs 3×1
- Strong Corner – Bail to deep third. Man on all #1 vertical. If #1 is not vertical, then take all of #2 vertical.
- Strong Apex – Man on #2 except when #2 goes under; then buzz to the flat. If #2 goes outside, then look to cut him underneath.
- Strong Hook – Take #3 if he heads outside. If #3 is inside, then push to the hook and take #2.
- Weak Hook – Defend all inside and deep cross by #3. If #3 is out, then push to defend the hook.
- Weak Apex – Man on RB if he flows to your (weak) side. If RB stays into block or flow away (strong), then cut the first crosser.
- Weak Corner – MEG: Man Everywhere he Goes.
Again, the above is not immediately intuitive, so let’s review a couple examples.
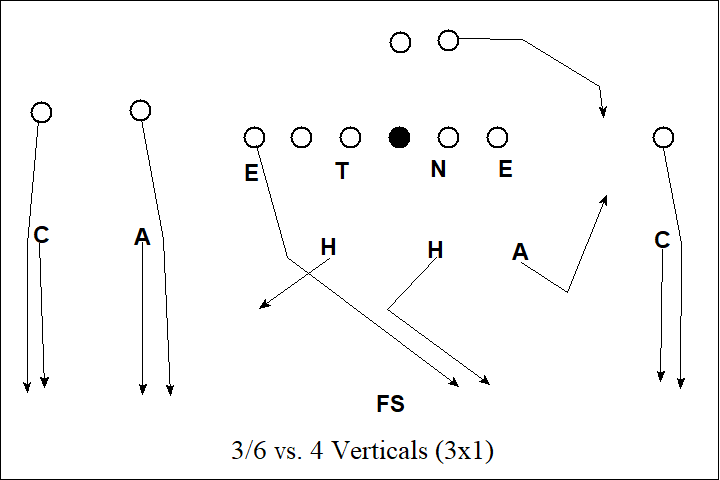
The strong corner is man on #1 since #1 is vertical, and the strong Apex is man on #2 for the same reason. The strong Hook works his drop and, upon seeing the tight end work a deep cross, leaves him to the weak Hook. The weak Hook takes #3 since he’s running a deep cross. The weak Apex takes the running back since he’s weak. And the backside corner is man-to-man on #1 no matter what.
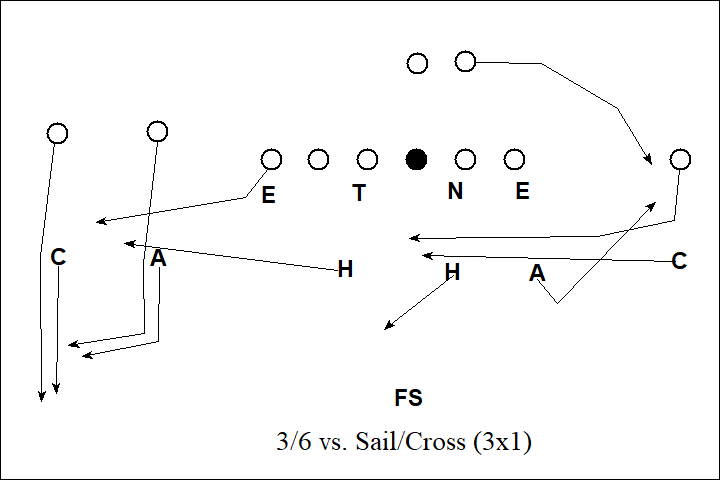
Here, the strong corner takes #1 since he’s vertical, and the strong Apex takes #2 since he’s out. The strong Hook takes #3 since he’s out, and the weak Hook pushes strong. The weak Apex takes the running back since the back weak, and the weak corner takes #1 man-to-man everywhere he goes.
Ultimately, Saban runs six main versions of Cover 3.
3 – 3 is Cover 3 with the safety to the passing strength (slot receiver versus 2×2) dropping to become the strong Apex.
3 Buzz – 3 Buzz is Cover 3 with the safety to the passing strength dropping to become the strong Hook.
6 – 6 is Cover 3 with the safety away from the passing strength dropping to become the weak Apex.
6 Buzz – 6 Buzz is Cover 3 with the away from the passing strength dropping to become the weak Hook.
Zone Open – Zone Open is a Cover 3 with the safety away from the tight end side dropping down to be become the Apex player in most cases. In 2×2 with a tight end and slot receiver, however, the safety will drop down to become the strong Hook.
Zone Alert – Zone Alert is a Cover 3 with safety to the fullback flow side comes down and become the Apex. Follows the same rules as 1 Alert.
Fire Zone
Fire Zone is Saban’s term for a form of one-high coverage with a 5-man rush. Most Fire Zones are described as a 3-deep, 3-under coverage. In all 2×2 and 3×1 sets, however, Saban places the corners in man coverage, so describing as a 3-deep coverage would be inaccurate. Rather, it would better to describe Saban’s Fire Zone as man coverage on the outside with the Apex and Hook players operating on similar principles as Cover 3/6.

Fire Zone
- Corners – They are man-to-man on #1. They will play aggressively on any likely ‘hot’ route, e.g., slant, hitch, quick fade, etc.
- Apex – They are man on #2 unless #2 goes under (inside and short) in the first 5 yards. The Apex players must, however, wall off the #2 from getting a clean release inside since there is only one Hook player. In addition, in all 3×1 sets where the #3 goes out, they will take the #3 to the flat and pass off #2 to the Hook player.
- Hook – Against any 2×2, the Hook player will begin to drop to the middle hook area and will defend the Hook area, protecting from deep to short. Only if there is nothing in the deep Hook area will they come up on any crossing routes. Against any 3×1, the Hook player will drop to the 3-man side. He will have all of #3 vertical. If the #3 goes out, however, then the Hook will have #2 man-to-man.

Here is an example of the Fire Zone concept at work against a 2×2 route combination. The corners each take #1 man-to-man. Neither #2 receiver is inside and short, so each Apex player has them man-to-man. And finally, the Hook player defends the middle hook area.

Here is a Fire Zone against a Yankee concept out of 3×1. Again, the corners each take #1 man-to-man. The weak Apex player has the running back weak. Since #3 is out, the strong Apex player must take him and the Hook must take #2 vertical.
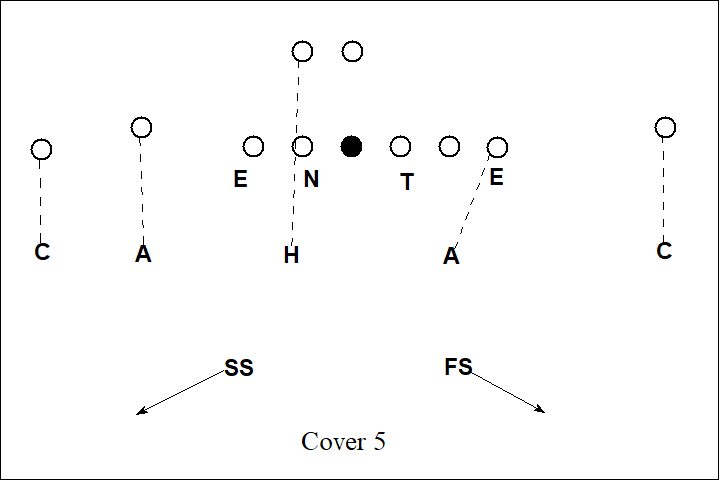
Cover 5 and Variants
Cover 5 is the first and most basic of Saban’s two-high coverages. It is a form of 2-deep, man-under coverage with the five underneath players engaging in a Dog technique. Dog means that the underneath players can trail versus any vertical route since they have help over the top. Both safeties will play deep half.
While most teams have some version of Saban’s Cover 5 in their playbook, Saban has two additional variants that are more unique.
5 Cougar is the same as Cover 5, except that if the #2 receiver is out in the first five yards, then the corner will take him and the Apex player will cut any route by #1. Essentially, it mixes what most coaches would describe as Palms or Cloud coverage with Cover 5. This can be a particularly devastating coverage since the corner will make a full man turn while eyeing the #2 if the #1 is vertical, which can lull the opposing quarterback into a false sense of security before he attempts to throw the out route by #2.
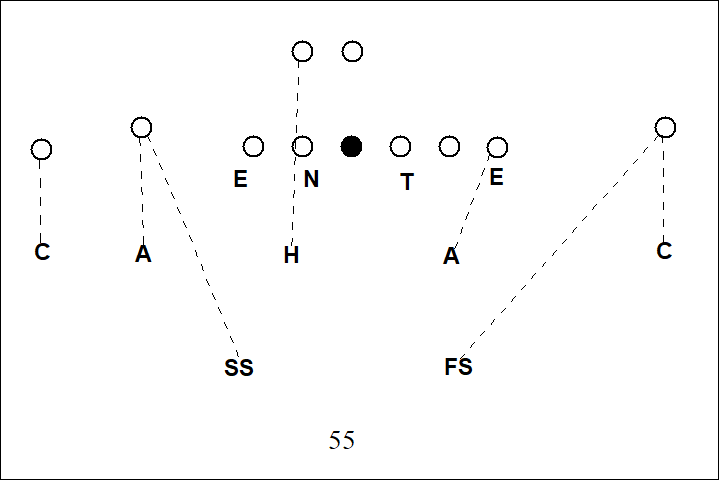
Saban also runs 55, which is a double bracket coverage. Each safety on either side will be responsible for bracketing the most dangerous receiver (WR, TE, or RB, based on game plan) to their side.
Cover 7 Introduction
Cover 7 is arguably the work horse of Saban’s pass coverage concepts. Ostensibly, Cover 7 is a form of quarters coverage. But Cover 7 contains so many variations and checks, however, that it defies any individual label.
Before we get into the weeds of Cover 7, we will need to explain two additional terms I will be using.
First is Triangle Coverage: any 3 defender over 2 receiver pass coverage concept. Against many 2×2 sets, Saban will call one triangle coverage to the passing strength or two-detached receiver side, and a second triangle coverage to the weak or one-detached receiver side. So in order to simplify the process, we will be discussing each triangle concept on their own.
Second is the term Box Coverage: any 5 defender over 3 receiver pass coverage concept. Against 3×1 sets, Saban has many different forms of trips coverages. But these coverages are separate and distinct from the coverage run on the one-man side. This gives Saban the ability to mix and match his trips side coverages with those on the backside. So whenever the backside safety is not involved in defending the trips side, I will be calling it a box coverage because it always inclues the box players.
Cover 7 Structure
As indicated above, Saban calls his Cover 7 plays so as to allow him to run different triangle and box coverages depending on the situation.
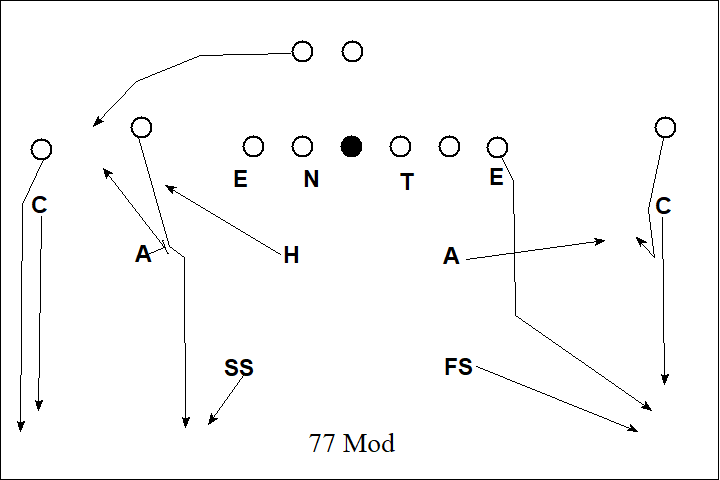
The first and simplest way for Saban to call a Cover 7 coverage will be to use the number 7 followed by a word (i.e., “7 X”). The word following 7 will indicate the triangle coverage that will be run against any 2 detached receivers in 2×2. To the 1 detached receiver side (tight end and receiver), the defense will run Cut (a triangle coverage) by default. For example, “7 Mod” means that the defense will run Mod versus any 2 detached receivers in 2×2, and run Cut to the 1 detached receiver side. By default, the defense will run the Stubbie (a box coverage) versus all 3×1 sets.
Second, if Saban wants the same triangle coverage concept run on both sides versus 2×2, then he will designate as such by stating 77 followed by the coverage he wishes to run. For example, “77 Mod” means the defense will run Mod on both sides versus any 2×2 set.
Third, Saban likes to run what he calls triple called coverages. Whenever he uses the word “Triple,” it indicates what box coverage to run versus any 3×1 set. For example, “Triple 7 Clip” means “run 7 vs 2×2 and run Clip vs 3×1.” If there is no “Triple” in the play call with Cover 7, then the defense will run Stubbie versus all 3×1 sets.
Triangle Coverages in Cover 7
- Mod (Triangle Coverage)
- Corner – The corner will begin in press alignment. The corner will be man-to-man on all #1 except when #1 breaks at 5 yards or less (e.g., shallow, 5 yard hitch). If #1 breaks at 5 yards or less, zone to deep quarter.
- Apex – Take the first man to the flat. E.g., #1 if he runs a 5 yard hitch, #2 if runs out or bubble, #3 if the RB swings to the flat, etc. If #2 begins to go vertical, always reroute #2 before breaking to cover the first man to the flat.
- Safety – Take all of #2 vertical. If #2 is not vertical, then bracket #1.
- Hook – Depends on the call to the opposite side.
- If Clamp, Cut, or Switch to opposite side: Take any #3 that will not be covered by the CB, Apex, or Safety. If none, defend the hook area deep to short.
- If Mod or Box to opposite side: Man on #3.
Mod is essentially the base form of quarters coverage for most defenses. The main difference between Mod and most quarters coverages out there is that the corner will not cover any short hitch route by #1. Saban runs Mod this way because if #1 runs a short hitch, then the most likely route by #2 is a corner or flag route, known collectively as a smash concept. By having the corner bail in such a situation, Saban defends the corner route by #2 in the most advantageous way possible: bracketing the #2 by the cornerback and safety.
Box is Saban’s term for Mod when he wants cornerback in a soft or off coverage alignment. Otherwise, it operates by all the same rules as Mod.
- Clamp (Triangle Coverage)
- Corner – Soft (off) alignment. Man on #1 for everything except when:
- #2 is out in first 5 yards, then take #2.
- #1 breaks at 5 yards or less (e.g., shallow, 5 yard hitch), then zone to deep quarter.
- Apex – Man on #2 except when #2 is out in first 5 yards. Then relate to #3. If no #3, then rob #1.
- Safety – Take #1 vertical if #2 is out in first 5 yards. Otherwise, take all of #2 vertical. If #2 is not vertical, then bracket #1.
Clamp is Saban’s term for what most coaches will call Palms or Cloud coverage. It essentially operates just like Box, except that the corner will take all of #2 out in the first five yards. This is a helpful coverage to run when the offense is running a lot of the #2 to the flat.

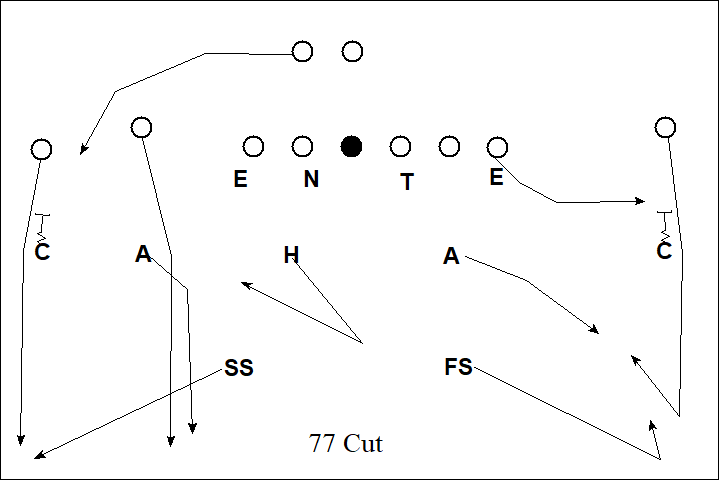
- Cut (Triangle Coverage)
- Corner – Off (soft) alignment. Take the first man to the flat. E.g., #1 if he runs a 5 yard hitch, #2 if runs out or bubble, #3 if the RB swings to the flat, etc.
- Apex – If #3 releases to your side, then man on #2 for everything. If #3 does not release to your side, then man on #2 for everything except when #2 goes out to the flat, and then cut (rob) #1.
- Safety – Take all of #1 vertical. If #1 is not vertical, then bracket #2.
Cut is what most coaches would describe as a pattern matching Cover 2. In my view, I think of it simply as Box with the cornerback and Apex roles reversed. Instead of the Apex, it will be the cornerback who will have the first to the flat and outside run responsibility. In turn, the Apex will take all of #2 vertical. Saban primarily uses Cut to the tight end and flanker side, where most of the pass concepts involve creating a horizontal stress on the defense. By having the cornerback sit in the flat area, Cut does a good job of countering this line of attack by an offense.
Cut comes with three special adjustments, however, that can be made by the corner.
The first is Alert Smash. If the corner gets a hitch route by #1 while the #2 is continuing vertical, then the corner will alert the Apex player of the smash. When the corner does so, then the corner will bail to get underneath #2 and the Apex will take the hitch by #1, just like in Mod.
If the #1 has a minus (compressed) split and there is no offset back near, then the corner will make a Push Alert call. In Push Alert, the Apex will take all of #1 under.
If the #1 has a plus (wide) split and there is no offset back near, then the corner will make a Tokyo call. In Tokyo, the corner will take all of #1 under.
Leach is term Saban uses to run Cut to the 2 detached receiver side.
- Switch (Triangle Coverage)
- Corner – Press alignment. Man on #1 for everything.
- Apex – Man on #2 except when #2 is out. If #2 is out, then rob #1 (think slant).
- Safety – Bracket #2 except when #2 is under short, then rob #1. If #2 is out, then you have #2 alone man-to-man.
Switch is your standard call against quick passes, particularly from a two detached receiver side. Generally speaking, most quick two-man concepts have the #2 as the quarterback’s first read except when the #2 goes out. So if the #2 runs a hitch or a slant, for example, Switch ensures that the Apex and Safety have him bracketed from beneath and over the top. If, however, #2 runs out, then the Safety will take the #2 and the Apex works to rob #1. So if the offense runs a slant-flat, for example, the Apex will be in an ideal position to defend the slant, and will not have to try to cross the #1’s face to cover the flat route. Instead, the Safety can roll over the top of the #1 to get to the flat. Or if the offense runs a fade-out or curl-flat, again the Apex will be an ideal position to defend underneath against the #1’s route.
Backside Coverages in Cover 7 vs 3×1
Offenses most commonly place their most dangerous receiver on the backside of any 3×1 set. In response, therefore, Saban has five main ways of handling the one-man side, depending on the game plan.
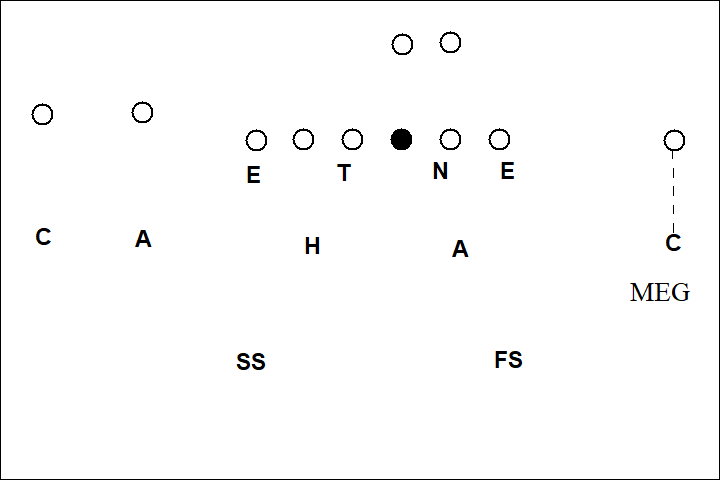
The first and most basic is MEG: Man Everywhere he Goes. MEG simply means the corner will man up on #1 for everything (no exceptions). Saban most commonly uses MEG when the #1 has a wide split, indicating that he will run an inside breaking route, and therefore will not benefit much – if at all – from support from the backside safety.
The second is for the corner to run a Dog technique and the corner to play deep half. As discussed above, Dog means that the corner can trail versus any vertical route since they have help over the top from the safety. In the context of Cover 7, Dog connotates both the technique of the corner and telling the safety to play deep half. Saban most commonly uses Dog to cap a particularly dangerous deep threat receiver.

The third is for the corner and safety to run a special bracket coverage known as Cone. In Cone, the corner will play #1 short and outside, and the safety will play #1 deep and inside. Saban most commonly uses Cone against a slightly compressed split by a #1, or against a truly dangerous receiver at all levels: short, moderate, and deep.

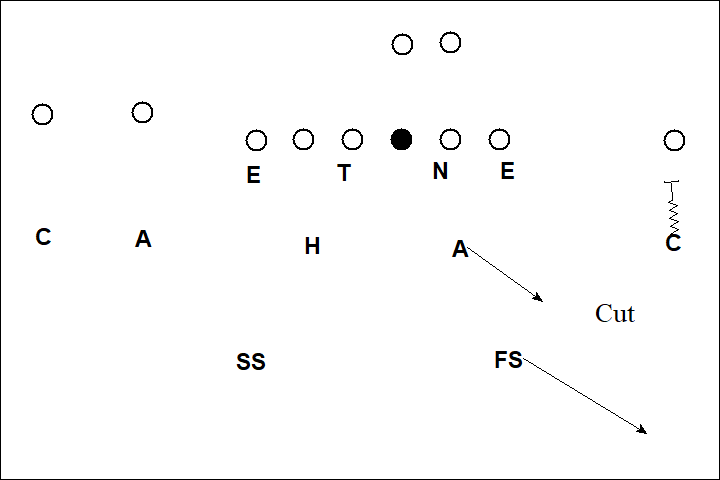
The fourth backside concept is Tuff. Here, the safety will take the first man to the flat and the corner will take the first to deep third. If there is no #2, then the safety will cut (rob) #1 underneath. When Saban is looking to bait the opposing quarterback to make an ill-fated decision to the backside of 3×1, Tuff is generally his first option.

The fifth and final backside concept, and perhaps my favorite, is simply to run our old friend Cut. The idea here is that since the #2 here is a running back, most of the #2’s routes will be to the flat. This means that the Apex player is freed up to cut #1 underneath and inside while the safety brackets him over the top. For most quarterbacks, seeing the corner sit with a deep safety over the top is an invitation to drill the #1 on any intermediate route: right where the Apex will be sitting.
Box Coverages in Cover 7
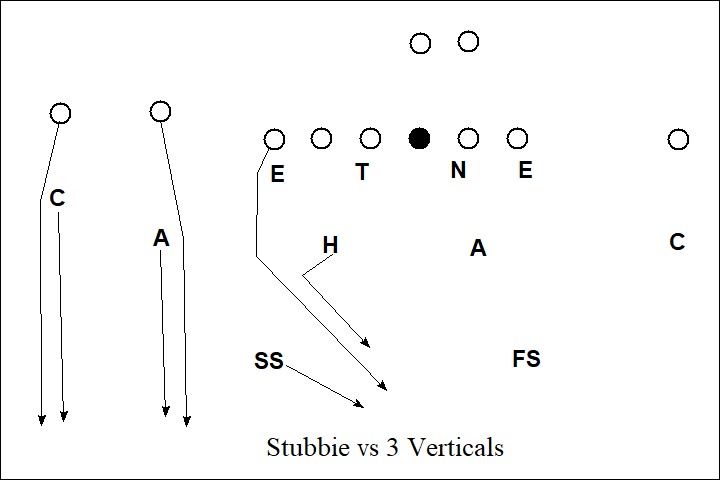
1) Stubbie (Box Coverage)
- Corner – Press alignment. MEG (Man Everywhere he Goes) on #1.
- Strong Apex – Man on #2 for everything except when #3 is out or #2 runs under. If #3 is out, then take #3 man to man. If #2 runs under, then zone off.
- Hook – If #2 or #3 runs under, then match that crossing route. Otherwise, wall off the #3 from the inside and take him to safety if he goes vertical.
- Safety – Take all of #3 vertical. If #3 is not vertical, then take/bracket #2 if he is vertical.
- Weak Apex – Depends on call to backside.
- If Meg, Cone, Dog, or Tuff to backside: Take any #2 weak. If no #2 weak, then take first crosser.
- If Cut to backside: Man on #2 for everything except when #2 goes out to the flat, and then rob #1.
Stubbie is just Mod adapted to a 3-man surface. Understanding that the least likely man to catch the ball in trips or trey is the outside receiver, Saban locks him down with only man coverage. Then it is effectively Mod on the #2 and #3 receivers.

Stomp is the same as Stubbie only with a Smash Alert call built in. If the corner gets a hitch route by #1 while the #2 is continuing vertical, then the corner will alert the Apex player of the smash. When the corner does so, then the corner will bail to get underneath #2 and the Apex will take the hitch by #1, just like in Mod.

- Zeke (Box Coverage)
- Corner – MEG on #1.
- Strong Apex – Take first out of #2/#3. If no out, then have #2 man-to-man.
- Hook – Take first in of #2/#3. If no in, then have #3 man-to-man.
- Safety – Play deep half.
- Weak Apex – Depends on call to backside.
- If Meg, Cone, Dog, or Tuff to backside: Take any #2 weak. If no #2 weak, then take first crosser.
- If Cut to backside: Man on #2 for everything except when #2 goes out to the flat, and then rob #1.
Zeke is Saban’s go-to coverage versus 3×1 sets where #2 and #3 are compressed or otherwise close to each other. Rather than having the Strong Apex and Hook potentially battle across each other to get to their designated man, Saban will simply have the Strong Apex take the first out and the Hook take the first in. If both #2 and #3 run vertical, then the Strong Apex and Hook have them man-to-man.

- In-Out (Box Coverage)
- Corner – Take the first man to the flat. E.g., #1 if he runs a 5 yard hitch, #2 if runs out or bubble, #3 if the RB swings to the flat, etc.
- Strong Apex – Take first out of #2/#3. If no out, then have #2 man-to-man.
- Hook – Take first in of #2/#3. If no in, then have #3 man-to-man.
- Safety – Play deep half. Always take #1 vertical.
- Weak Apex – Depends on call to backside.
- If Meg, Cone, Dog, or Tuff to backside: Take any #2 weak. If no #2 weak, then take first crosser.
- If Cut to backside: Man on #2 for everything except when #2 goes out to the flat, and then rob #1.
In-Out is Saban’s preferred trips coverage when the #1 has a minus (compressed) split. For the Strong Apex and Hook players, their assignments are exactly the same as in Zeke. The difference is with the corner and the safety. In-Out has the corner sitting and taking the first man to the flat, and the safety taking #1 if he goes vertical.

Full Field Coverages in Cover 7 for 3×1 Sets
While Saban prefers to run box coverages to keep his options open on the backside, that does not prevent him from calling full field coverage assignments against 3×1 sets. To free up the backside safety, Saban runs two primary full field coverages by placing the backside corner MEG on #1.
- Palms (Full Field Coverage)
- Strong Corner – Soft (off) alignment. Man on #1 for everything except when:
- #2 is out in first 5 yards, then take #2.
- #1 breaks at 5 yards or less (e.g., shallow, 5 yard hitch). If #1 breaks at 5 yards or less, zone to deep quarter.
- Strong Apex – Man on #2 except when #2 is out in first 5 yards. Then relate to #3. If no #3, then rob #1.
- Strong Safety – Take #1 vertical if #2 is out in first 5 yards. Otherwise, take all of #2 vertical. If #2 is not vertical, then bracket #1.
- Hook – Man on #3 except when #3 is under. If #3 is under, then zone to defend curl area. If #3 runs a deep cross, then trail since you have help from the weak safety.
- Weak Apex – Man on #2 weak or #4 strong (RB). Otherwise, take first crosser.
- Weak Safety – Poach #3 vertical. If #3 is not vertical, then poach #1 vertical backside.
- Weak Corner – MEG on #1.
Palms is just Clamp on the #1 and #2 receivers in a 3×1 set. Nothing changes for the strong corner, Strong Apex, or Strong Safety. The Hook player, however, has #3 man-to-man except when #3 runs under. In addition, by giving the weak corner a MEG assignment on the #1, the weak safety is freed to help on any vertical route by #3. If #3 is not vertical, however, then the weak safety will work to poach any routes by the backside #1.

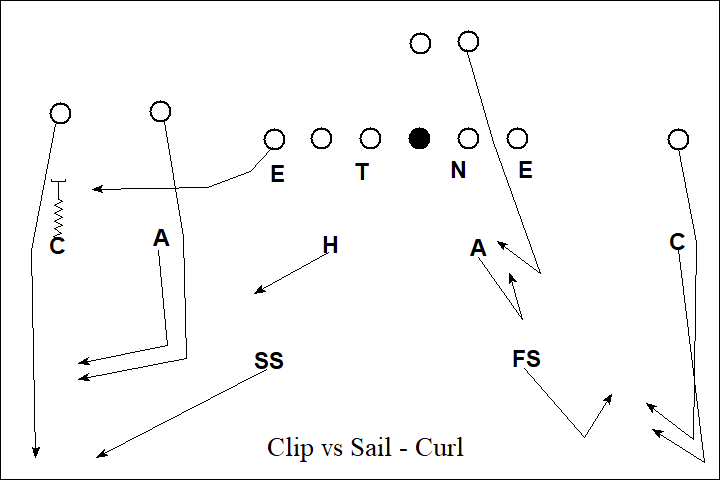
- Clip (Full Field Coverage)
- Strong Corner – Off (soft) alignment. Take the first man to the flat. E.g., #1 if he runs a 5 yard hitch, #2 if runs out or bubble, #3 if the RB swings to the flat, etc.
- Strong Apex – If #3 releases to flat, then man on #2 for everything. If #3 does not release to flat, then man on #2 for everything except when #2 goes out to the flat, and then rob #1 (think slant).
- Hook – Man on #3 except when #3 is out to the flat or runs a deep cross route. If #3 is out to the flat, then zone to defend curl area. If #3 is vertical back across, then carry to weak safety.
- Strong Safety – Take all of #1 vertical. If #1 is not vertical, then bracket #2.
- Weak Apex – Man on #2 weak or #4 strong (RB).
- Weak Safety – Poach #3 vertical. If #3 is not vertical, then poach #1 vertical backside.
- Weak Corner – MEG on #1.
Clip is effectively Cut, but for 3×1 sets. And like Cut, Clip is designed to defend against horizontal-based attacks by the offense. With the strong corner sitting in the flat, the remaining defenders are freed up to better attack any in-breaking routes by the offense. If the offense runs a double slant flat combination, for example, then the strong Apex and Hook players would be in perfect position to defend both slants with inside leverage.
Wrapping Up
As you hopefully have seen from the above, Saban’s pass coverage system is very modular and discrete in its approach, giving the defensive coordinator a variety of options that he can piece together to match what the offense might present. But in going through these materials, I hope the reader can come away with a wholly different conclusion as well: that Nick Saban is a great teacher.
Most college coordinators would balk at the prospect to teach all of the above (and more) to their players so that they are ready to execute on Saturdays. Saban doesn’t. Every year, he has his players ready to go out and run this entire system in face of graduations, incoming freshmen, injuries, and the like. The only way a coach can do that – year in and year out – is by being a great instructor. And that, despite all of the interesting strategies he employs, should be Nick Saban’s greatest legacy.
Awesome read, I wish we had more content on here instead of it being on Inside Texas!
Check out the flyover football board! It’s free!
https://insidetexas.com/forums/forums/flyover-football.27/
Awesome material. I really appreciate the Saban system.
Fulton Analysis: On Track - Buckeye Scoop | Buckeye Scoop
[…] The Buckeyes then targeted Indiana’s soft cover 4 with the passing game. Specifically, Indiana frequently used a cover 4 variation akin to what Nick Saban calls “Cone,” […]
Film Study: Michigan State Had No Answers for Ohio State's Explosive Offense, Which Should Worry the Team Up North - NEWS TODAY
[…] coverage full of checks and variations that is more of a system than a single play, known simply as Cover 7. When implemented properly, the coverage can morph into whatever is needed to stop the […]
Film Stare: Michigan Declare Had No Solutions for Ohio Declare’s Explosive Offense, Which Need to peaceable Apprehension the Personnel Up N – UsaDots
[…] of checks and adaptations that is extra of a system than a single play, identified simply as Quilt 7. When implemented properly, the coverage can morph into whatever is wanted to remain the […]
Fulton Analysis: Knowles' Defense - Buckeye Scoop | Buckeye Scoop
[…] the boundary (one of cover 4 strengths is playing different variations to each side of the field—see this Cameron Soran article for a further breakdown of cover 4 […]
Reading this great stuff made me buy the book.