
by Cameron Soran
This article is being reposted here after originally finding it’s home at riley-kolste football. If you enjoy Cameron’s detailed breakdowns of playbooks and coverage, his book is a must have!
********
Plato and Aristotle. Pompey and Caesar. Obi-Wan and Anakin. Hayes and Schembechler. The motif of the student-turned-rival is as old and recurring as any in human history. It is one of those rare tropes of fiction and themes of history that never quite seems to lose its luster no matter how many times we see it played out. And for the foreseeable future, the rivalry between Nick Saban and Kirby Smart promises to be another great chapter of this millennia-long refrain.
My primary reason for studying Kirby Smart’s defense was in finding out how much he would keep from his near decade-long boss, and how much he would truly carve out on his own. Would he be simply Saban 2.0 – now with improved media relations? Or would he deliver a distinct defensive philosophy that was entirely his own? The answer, of course, is somewhat in between.
In many ways, defensive coaches are molded by the offenses they face. Saban, for example, spent a lifetime facing a litany of offensive schemes at both the collegiate and NFL levels, which in turn has led him to his near omnivorous approach to defense. There is almost no front, coverage, or blitz missing in Saban’s mental library, and he is thoroughly prepared to use them all if the situation demands it.
Smart’s defense, by contrast, appears more molded by the proliferation of the spread offense that coincides with his coaching career. His defense is more condensed, more streamlined, more focused. In short, Smart’s defense appears to have fewer individual play calls, but with more checks and adjustments built-in. When Smart calls a double outside blitz, for example, he isn’t particularly tied to which two guys are coming – he lets the offensive formation dictate that. So when Smart sends in a one-word play call, he really isn’t sending in one play: he’s sending in four to five plays depending on how the offense lines up. So no, it is not any less complicated than Saban’s defense. But it is structured quite differently.
Personnel and Overview
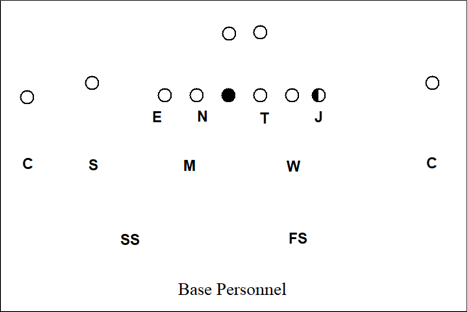
Outside of goal line-type situations, Smart’s approach to defensive personnel tends to be fairly direct. If the offense sends out two or fewer receivers on the field, then he tends to stay in base personnel (no nickel player). But if the offense sends out three or more receivers, then he generally sticks to his nickel package. There are exceptions of course, like when Smart preferred to run more base personnel against Notre Dame even when the Irish trotted a third receiver on the field. But for the most part, he is fairly consistent in his approach.
Regardless of the number of defensive backs, the five front players remain essentially the same: a nose, a tackle, an end, a “Jack” hybrid defensive end/outside linebacker, and a “Mike” inside linebacker. That’s not to say there are never any substitutions, but that all substitutions adhere to this framework. If the front calls for a 3-technique, for example, then the tackle is nearly always filling that role.
Switching to dime has two parts. First, the Star (nickel player in Saban’s terminology) comes in to replace Sam linebacker. Second, one of the inside linebackers becomes the Money player, who will always align to the #2 weak versus 2×2 sets and to the #3 strong versus 3×1 and 3×2 sets.
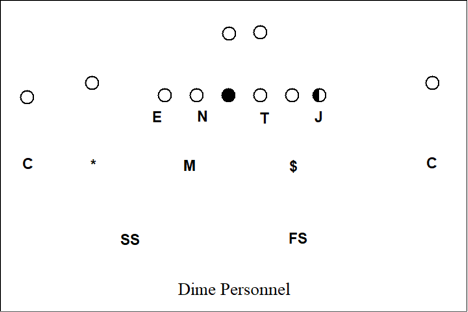
In stark contrast to Saban’s approach of almost having two playbooks – one for base personnel and one for nickel/dime – Smart basically runs the same concepts regardless of who’s out there. So if Georgia is in a Tite front, for example, the Bulldogs will run the same plays whether they were in base, nickel, or dime. (And if Smart has two separate sections for his base and nickel/dime defenses, then there is a LOT of repeats between the two.)
Since Smart seems to organize his plays around fronts rather than personnel, that’s how I will organize my treatment of his defense. I will begin with his 3-man fronts – 3-4 Base and Tite fronts – before moving onto his 4-man fronts: Over, Under, and Even.
Coverage Terminology
To keep this article shorter (and because Smart uses the same coverage system), I will be borrowing all Saban’s coverage terminology that I broke down here: https://rileykolstefootball.com/2018/04/15/nick-sabans-alabama-pass-coverages/. While I will be describing each coverage term as I go along, I recommend referencing that article for a more complete understanding of how Smart and Saban organize their coverages.
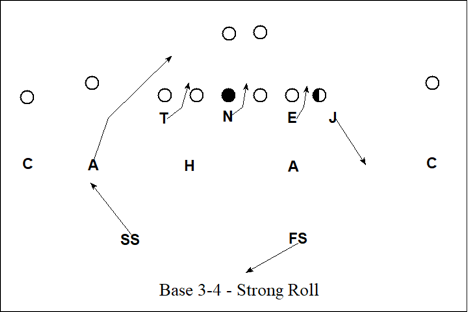
I. 3-4 Base Front
Smart uses the Base 3-4 front primarily in run-heavy down-and-distance situations.
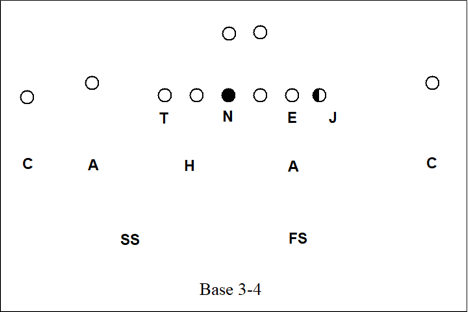
3-4 Base is generally the starting point for most 3-4 defenses. The nose aligns in 0-tech across from the center, and the tackle and the end each align directly across from an offensive tackle. The inside linebackers will each align in 30-tech: outside shoulder of the guard and about 5 yards from the line of scrimmage. Everyone else’s alignment is dictated by offensive formation and play call.
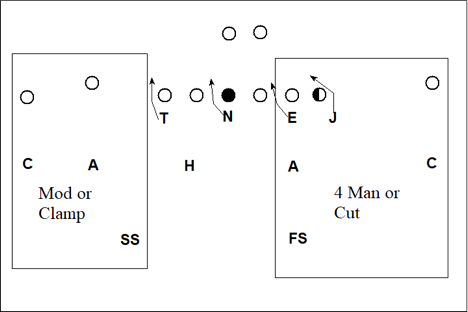
A) 3-4 Base Front – Two-High Base Calls
When Smart wants to rush four and keep two safeties deep, then he runs a fairly standard set of coverages. Against 2×2 sets, he will almost exclusively Mod or Clamp to any 2-receiver side, and run 4 Man or Cut to a tight end and receiver side. This is not, however, a strong/weak or field/boundary distinction. If there is a tight end and receiver to each side, for example, then Smart will nearly always run 4 Man or Cut to each side. Or if there are two receivers to each side, then he will nearly run Mod or Clamp to each side.
Against 3×1 sets, he will run Stubbie or Palms to the 3-man side, and a form of Red 2 to the backside (more on that below).
1) Mod
- Corner– Play man-to-man on all #1 except when #1 breaks at 5 yards or less (e.g., shallow, 5 yard hitch). If #1 breaks at 5 yards or less, zone to deep quarter (think Smash).
- Apex– Take the first man to the flat. E.g., #1 if he runs a 5 yard hitch, #2 if runs out or bubble, #3 if the RB swings to the flat, etc. If #2 begins to go vertical, always reroute #2 before breaking to cover the first man to the flat.
- Safety– Take all of #2 vertical. If #2 is not vertical, then bracket #1.
- Hook – Depends on the call to the opposite side, but in general: Take any #3 that will not be covered by the CB, Apex, or Safety to that side. If none, defend the hook area deep to short.
Mod is what most coaches would call Quarters, Base Quarters, or Sky. The only difference between Mod and how some other coaches will run it is that it has an adjustment built in to defend against a Smash concept. That is, when the #1 receiver stops short, the corner will then bail to help out on any vertical by the #2.
2) Clamp
- Corner – Align with an inside eye on #2. Man on #1 for everything except when:
- #2 is out in first 5 yards, then take #2.
- #1 breaks at 5 yards or less (e.g., shallow, 5 yard hitch), then zone to deep quarter.
- Apex – Man on #2 except when #2 is out in first 5 yards. Then relate to #3. If no #3, then rob #1. You do not have #2 vertical.
- Safety – Take #1 vertical if #2 is out in first 5 yards. Otherwise, take all of #2 vertical. If #2 is not vertical, then bracket #1.
- Hook – Take any #3 that will not be covered by the CB, Apex, or Safety. If no uncovered #3, then defend the hook area deep to short.
Clamp is what most coaches call 2-Read, Palms, or Cloud. Clamp is exactly the same as Mod, except when the #2 goes out in the first 5 yards, the corner steps up to take the #2 and the safety will cover the #1 deep. Smart doesn’t seem to run Clamp, however, nearly as much as Mod. My speculation for this is that Smart prefers his corners to exclusively read the #1 receiver, rather than having their focus split between the #1 and the #2.
3) 4 Man
- Corner– Play man-to-man on all #1.
- Apex– Take the first man to the flat. If #2 begins to go vertical, always reroute #2 before breaking to cover the first man to the flat.
- Safety– Take all of #2 vertical. If #2 is not vertical, then bracket #1.
- Hook – Depends on the call to the opposite side, but in general: Take any #3 that will not be covered by the CB, Apex, or Safety. If none, defend the hook area deep to short.
4 Man is just Mod with the corner playing man-to-man on the #1 exclusively. 4 Man one of Smart’s preferred coverages against a tight end and flanker side, particularly in short-yardage or red zone type situations.
4) Cut
- Corner – Align with inside eye into backfield. Take the first man to the flat. E.g., #1 if he runs a 5 yard hitch, #2 if runs out or bubble, #3 if the RB swings to the flat, etc.
- Apex – If #3 releases to the flat, then man on #2 for everything. If #3 does not release to the flat, then man on #2 for everything except when #2 goes out to the flat, and then cut (rob) #1.
- Safety – Take all of #1 vertical. If #1 is not vertical, then bracket #2.
- Hook – Take any #3 that will not be covered by the CB, Apex, or Safety. If no uncovered #3, then defend the hook area deep to short.
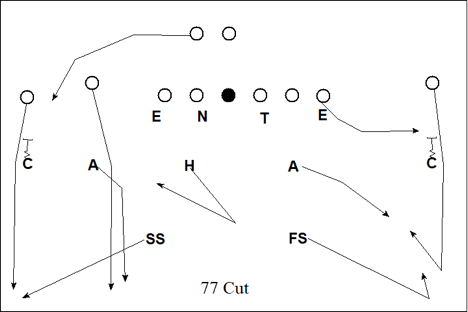
Cut is what most coaches would describe as a pattern matching Cover 2. Personally, I think of it simply as Mod with the cornerback and Apex roles reversed. Instead of the Apex, it will be the cornerback who will have the first to the flat and outside run responsibility. In turn, the Apex will take all of #2 vertical. Like his old boss, Smart likes to Cut against a tight end and flanker side. And occasionally, for reasons I cannot fathom, on the single receiver side on 2nd & 26.
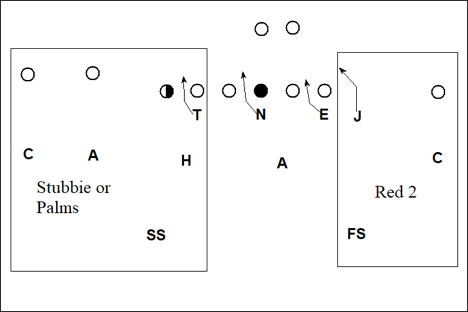
5) Stubbie with Red 2 Weak
- Strong Corner – Press alignment. Man-to-man on #1.
- Strong Apex – Man on #2 for everything except when #3 is out to the flat or #2 runs under. If #3 is out to the flat, then take #3 man to man. If #2 runs under, then zone to curl.
- Hook – If #2 or #3 runs under, then match that crossing route. Otherwise, wall off the #3 from the inside and take him to safety if he goes vertical. You do not have #3 out.
- Strong Safety – Take all of #3 vertical. If #3 is not vertical, then take/bracket #2 if he is vertical.
- Weak Apex – Man-to-man on running back. If running back stays into block, then defend against crossers deep to short.
- Weak Safety – If #1 takes an outside release or works under, then work towards the middle of the field to help on any #3 vertical. If #1 takes an inside release, cover him over the top and inside since you will have help from the corner.
- Weak Corner – Slow bail. If #1 takes an outside release, then you have him man-to-man. If #1 takes an inside release, cover him underneath and outside since you will have help from the safety.
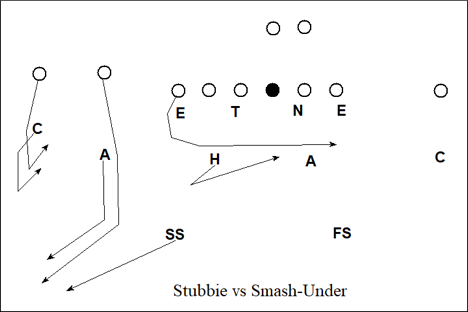
Stubbie is just the Strong Apex, Strong Safety, and Hook running Clamp on the #2 and #3, with the corner locked in man-to-man on #1. On the backside, the corner and safety will bracket any inside release by the #1. If the #1 breaks outside, however, the corner simply has him man-to-man.
I should note that the coverage concept run by the weak safety and weak corner here is essentially a form of Red 2, a coverage invented by Saban and Belichick when they coached together at the Browns back in the 1990s. The original Red 2 coverage, however, varies the depth at which the corner will take the #1 receiver before breaking back down in the flat based on game plan. That is why Red 2 is infamous among defensive coaches. First, you have to carefully study your opponent to know when and where the corner should break off based on likely route combinations, often by cues from the #1 or #2 receivers. Second, you have to teach the corner and safety those new coverage rules each week.
Smart, however, doesn’t run the original form of Red 2. He runs a simplified version where the corner is man-to-man on #1 and keeps underneath leverage against any inside route by the receiver. In practice, this means the corner is pretty quick to the ball on any short passes outside because he’s already playing underneath – not over the top – of his man. In theory, the original version of Red 2 is better, but I’m guessing Smart took one look at the cost-benefit analysis with college practice times and realized running it wasn’t practical.
6) Palms with Red 2 Weak
- Strong Corner – Align with an inside eye on #2. Man on #1 for everything except when #2 is out in first 5 yards, then take #2.
- Strong Apex – Take #3 to the flat. If #2 is out to the flat in the first 5 yards, then push to cover #3. If #2 begins to go vertical, always reroute #2 before breaking to cover the first man to the flat.
- Hook – Man-to-man on #3 (including all vertical) except when #3 is out to the flat. Then push to cover #2 from the inside.
- Strong Safety – Take #1 vertical if #2 is out in first 5 yards. Otherwise, take all of #2 vertical. If #2 is not vertical, then bracket #1.
- Weak Apex – Man-to-man on running back. If running back stays into block, then defend against crossers deep to short.
- Weak Safety – If #1 takes an outside release or runs under, then work towards the middle of the field to help on any #3 vertical. If #1 takes an inside release, cover him over the top and inside since you will have help from the corner.
- Weak Corner – Slow bail. If #1 takes an outside release, then you have him man-to-man. If #1 takes an inside release, cover him underneath and outside since you will have help from the safety. If #1 runs under, you have him man-to-man.
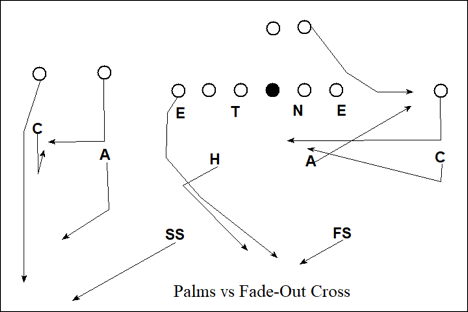
Palms is simply Clamp on #1 and #2, with the Hook taking any vertical by the #3. It abides by all the same backside rules as Stubbie.
B. 3-4 Base Front – One-High Base Calls
I only identified two one-high safety coverages out of Base 3-4 that were not blitzes. And the first was about as straightforward as one can get. The Apex to the passing strength would be the fourth rusher, and safety to that same side would rotate down.
For avoidance of doubt, Smart runs Cover 3 on the same pattern matching principles as Saban.
The other one was … not so straightforward. Essentially, it was a form of Cover 3 with a corner sitting in the flat that Saban calls Cora.
1) Cora
- Strong Corner – Take the first man to the flat. E.g., #1 if he runs a 5 yard hitch, #2 if runs out or bubble, #3 if the RB swings to the flat, etc.
- Strong Apex – Zone to the curl and match any man in the area.
- Hook – Zone to the strong side hook and match any man in the area.
- Strong Safety – Drop to strong side deep third. Midpoint #1 and #2 if they both are vertical. If only one of #1 and #2 are vertical, then cover that man.
- Weak Apex – Play the first man out to the flat weak. If none, then work back to cover the vertical hook area.
- Weak Safety – Play middle deep third. Work to #3 if he is vertical.
- Weak Corner – Man to man on weak #1.
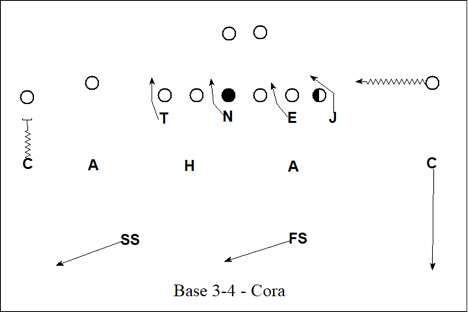
It seems that Cora may be a check for Smart whenever the weak #1 and #2 are compressed, but don’t hold me to that. It may be specific to game plan. But it comes up a lot more when #1 ends up compressed.
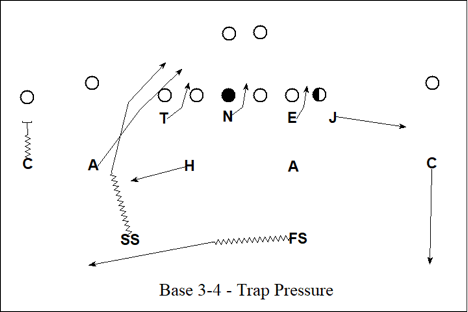
C. 3-4 Base Front – Blitzes
When it comes to blitzes, Smart’s favorite was a form of trap pressure. Both the strong side Apex and strong safety would rush from the outside, and the corner would play the flat. Essentially, each side is playing Cut with no Hook player in the middle.
Another favorite of Smart’s is the boundary corner blitz. The interesting wrinkle is that he typically leaves the boundary safety in man-to-man coverage on the boundary #1, and then runs a form of 2-high coverage to the field (typically Clamp). Overall, it was a pretty effective pressure.

II. 3-4 Tite Front
The 3-4 Tite front is all the rage these days against spread offenses, and Smart is no different. The earliest use of the 3-4 Tite that I am aware of was in the early 1990s among 3-4 NFL defensive coordinators. Many defenses would use it as a method of combating zone heavy pro offenses, but it went out of fashion for time. In the past couple years, it has reemerged as a weapon against zone-based spread offenses at the collegiate and high school levels, with some use trickling back up into the NFL.
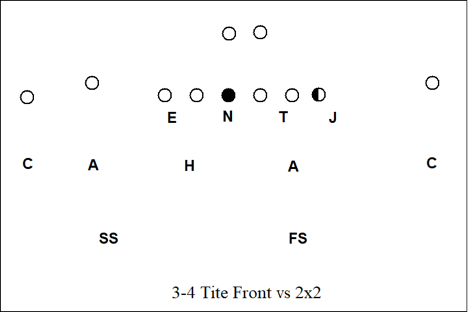
In the 3-4 Tite, the nose aligns in 0-tech across from the center, and the tackle and the end each align on the inside shoulder of the tackles. The reason for the Tite front’s popularity is that it is difficult for the offensive line to generate a good push on interior runs with the defensive line occupying 3 of the 4 interior gaps. While the same could be accomplished with a Bear front (End and Tackle aligning on the outside shoulder of the guard), the Tite front gives the end and tackle greater ability to contain-rush the quarterback. Mind you that rush is invariably going to be slower than if the end or tackle were aligned outside the offensive tackle, but it is a more viable option then from a Bear front alignment.
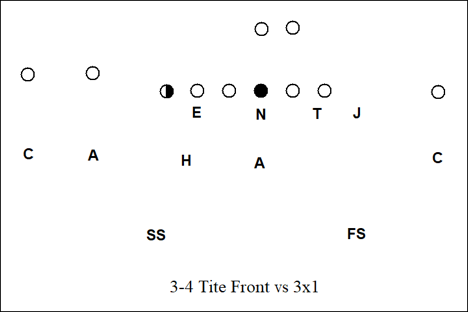
Against 3×1 sets with a tight end, Smart has the End align head up on the offensive tackle to prevent the tight end from having a clean path up to the linebackers.
To be clear, however, the Tite front is not some existential threat to the offensive line on run plays. Offensive linemen are very comfortable double-teaming a 3-technique (outside shoulder of the guard) up to a linebacker, and that doesn’t go away when a defensive linemen moves a few inches towards the tackle. It just makes it harder to for the linemen to know which of them will peel off to take the linebacker when running inside. On outside runs, by contrast, the Tite front makes it much easier for the guard and tackle to seal off the defensive end before the tackle peels off to take on the linebacker. So one of the main ideas behind a defense running a Tite front then is simply to force the ball outside and have your quicker guys make tackles in space. It comes at the expense of a slower pass rush, but that may be more than a sufficient trade off based on offensive scheme and the down-and-distance situation.
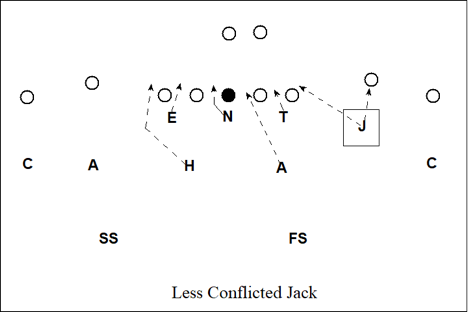
The other reason is to fight RPOs. Normally, the conflict player on a defense is the linebacker (or DB) responsible for the open B-Gap. This has led me to coin the phrase, “Follow the Nose,” since that’s where the open B-Gap is typically located.
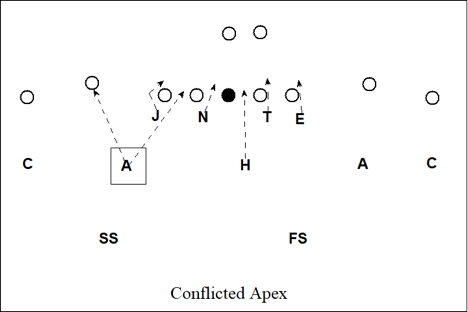
In a Tite front, there is no open B-Gap. Instead, there is an open C- or D-Gap. So while the offense can still read the guy with both run and pass responsibilities, at least in a Tite front, that conflict is minimized.
Smart started off using the Tite front in 2017 primarily on run-heavy downs to great effect. As the season progressed, Smart began to use it more in passing down situations, which worked … less well. I am not sure what Smart’s rationale was when using the Tite front in this manner, but it tended to just give the QB more time in the pocket.
While Smart can be an exceptionally varied play caller, a lot of Smart’s use of a Tite front comes from 6 main plays (there are others, but I’m just going to be covering the main ones here). That may sound simple or easy to defend, but it is not. The reason is that Smart is very adept at switching which call the defense will run based on offensive formation and game plan. Compounding the problem is that Smart likes to shift from a Tite front to an Over front and vice versa just before the snap. It is devilish it its apparent simplicity.
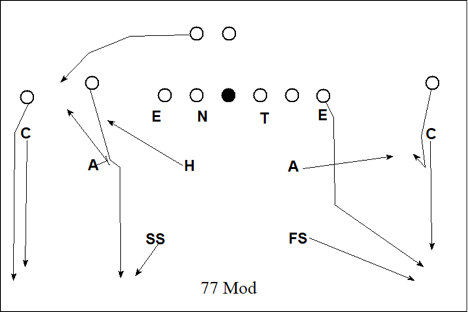
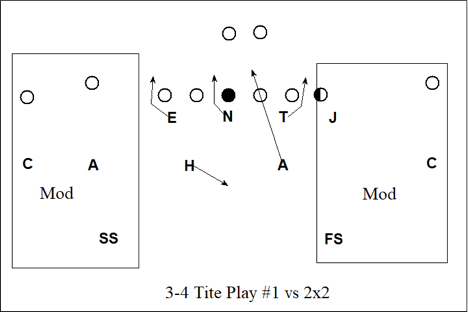
A. 3-4 Tite: Play #1 – Mod with a Weak ILB Rush
The first play simply involves the weak inside linebacker rushing with a two-way go on the guard, and running Mod to both sides of 2×2 sets.
Against 3×1 sets, Smart will alter the coverage to Poach, but otherwise everything remains the same.
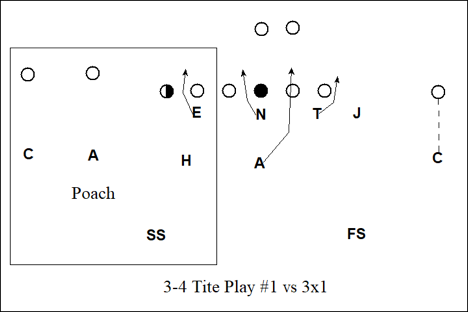
If the quarterback sprints out to either side, however, the inside linebacker will become an exterior rusher to the same side as the quarterback is rolling. I’m not sure I would have picked this up had Smart ran it less frequently, but this ended up being the most common play I charted from Georgia’s defense.
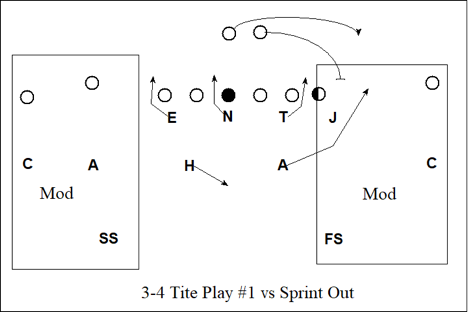
Smart primarily uses this play primarily in run/RPO-heavy down-and-distance situations.
B. 3-4 Tite: Play #2 – Cover 3 with a Strong Apex Rush
The second play is to have the strong Apex player rush from the outside, roll the strong safety down, and play Cover 3.
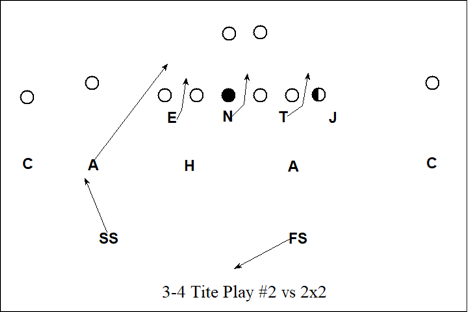
Nothing really changes against 3×1 sets, except if the offense shows 3-open to the field. In that situation, the Hook player will rush from the outside and the strong safety will rotate down to replace the Hook.
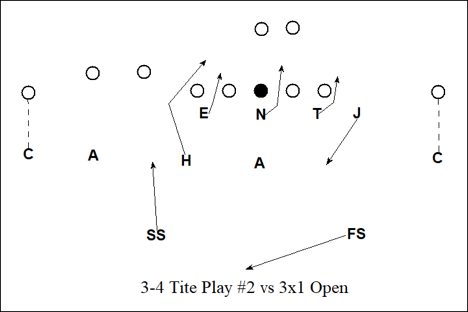
Smart seems to use this play a lot more when the ball is on the far hash and he wants a rusher coming from the field. Beyond that, I could not discern a pattern for when he liked to run this concept.
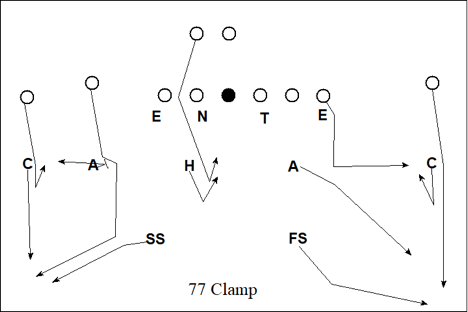
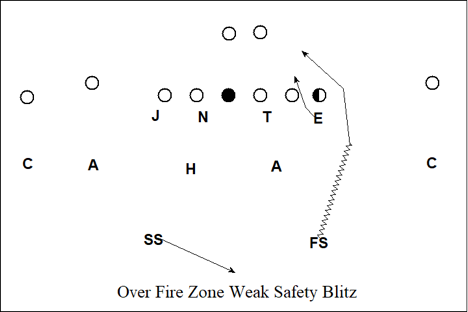
C. 3-4 Tite: Play #3 – Double Outside Blitz Fire Zone
The third play has both outside players (whether they are linebackers or defensive backs) blitzing from the outside and running Fire Zone coverage behind it.
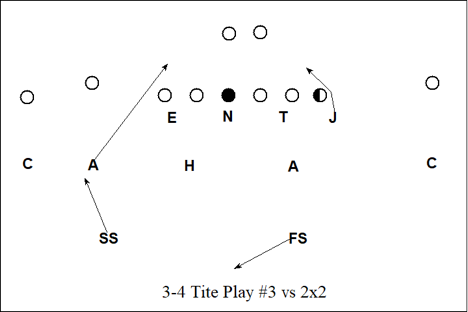
Like the second play, nothing will change against 3×1 sets except when the offense shows 3-open to the field, where it will be the Hook that rushes.
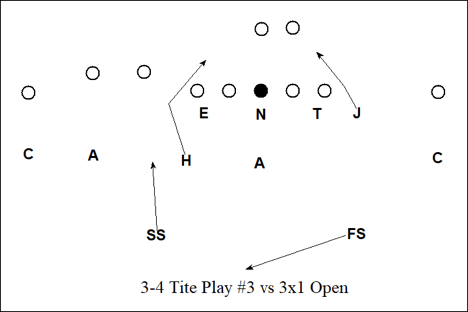
Smart will run this play on nearly any down-and-distance and against nearly every offensive personnel grouping.
D. 3-4 Tite: Play #4 – Double Outside Blitz Cover 1 Man
The fourth play is exactly the same as the third, only they are running Cover 1 Man instead of a Fire Zone.

Smart runs this play more on short yardage situations, or when he’s seeing more zone-beater concepts from the offense.
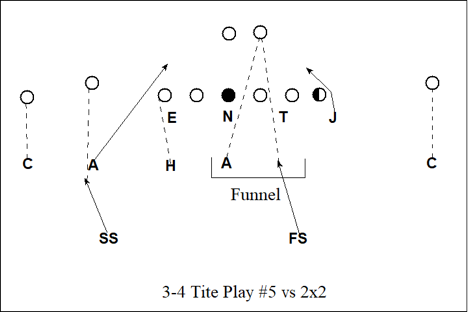
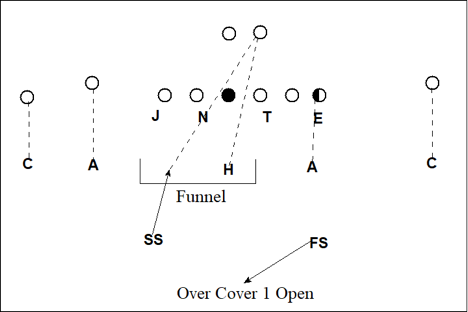
E. 3-4 Tite: Play #5 – Double Outside Blitz Cover 0
In short-yardage or red zone situations, Smart will run a similar double outside blitz but with the second safety coming down to help play a 3-on-2 funnel concept. Essentially, the two safeties and the remaining inside linebacker will take the tight end and running back based on flow, and the third will become the robber player in the hole.
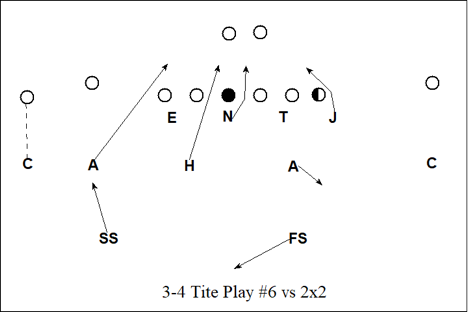
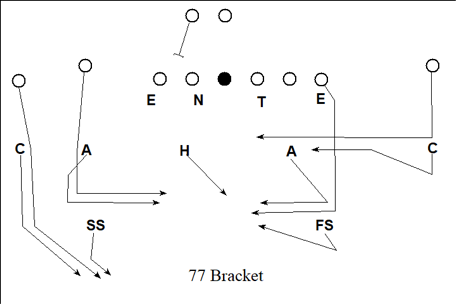
F. 3-4 Tite: Play #6 – Blitz 6 with Hot Coverage
When Smart is feeling particularly aggressive on passing downs, he will run a 6-man blitz with a form of 5-man zone coverage commonly known as Hot. Smart appears to have a couple variations of this play, but it generally looks like this:
I originally intended to write a long description on Hot coverage, but Chris B. Brown of Smartfootball.com recently tweeted an excellent description.
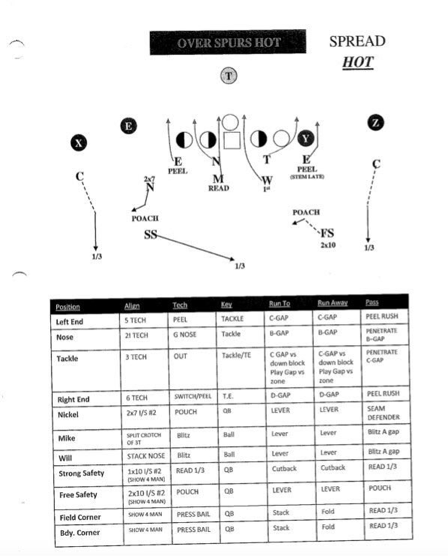
And honestly, I’m not going to do any better describing Hot coverage than this. Also, Smart runs the exact play shown above from his Over front package.
III. Over Front
Manny Diaz, defensive coordinator at Miami, has a theory that 90% of college football offenses run 60% of the same plays. When studying Smart’s defense, I came to a similar hypothesis: 90% of Over front defenses run 60% of the same plays. The terminology, of course, might be different from program to program, but the exact same plays keep showing up. There was very little Smart ran from an Over front, for example, that you couldn’t also find Brent Venables running at Clemson. This is not intended as a criticism – merely a note that these concepts remain constant among Over front defenses facing the spread.
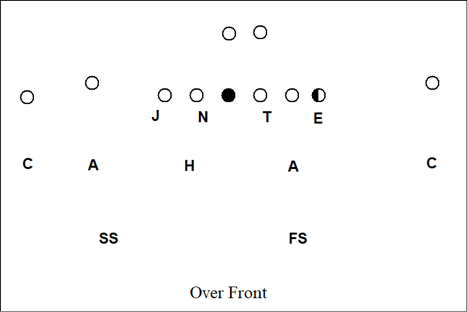
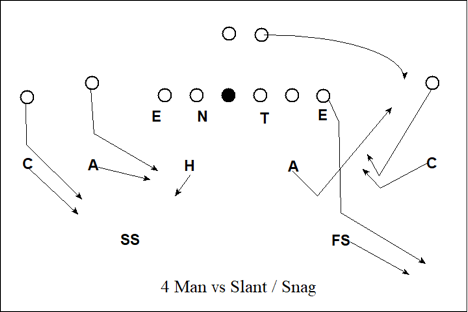
A. Over Front – Two-High Base Calls
Smart has a relatively simple system for his 2-high coverages from an Over front. Against 2-detached (i.e., 2 receivers, or a receiver and a tight end in the slot), then he will run the following coverages in order of frequency: 1) Bracket; 2) Switch; and 3) Clamp. Against a wide receiver and a tight end, he will primarily run Cut, but also some occasional Mod.
Against 3×1 sets, Smart leans heavy on Stubbie, Stump, and Trio to the 3-man side, while mixing Cut or Meg/Cone to the backside.
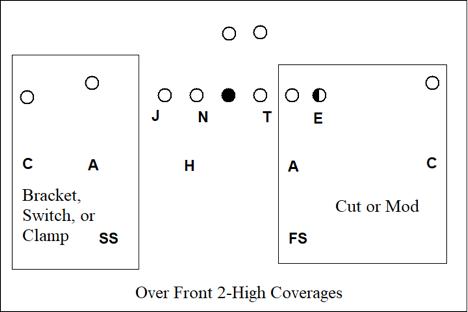
1) Bracket (Triangle Coverage)
- Corner – Man-to-man on #1.
- Apex – Man-to-man on #2.
- Safety – Bracket the deeper of #1 and #2.
- Hook – Take any #3 that will not be covered by the CB, Apex, or Safety. If no uncovered #3, then defend the hook area deep to short.
The most common triangle coverage Smart uses against two detached is Bracket. It is the best anti-Mills/Pin (Post-Dig) quarters concept out there, and since the Apex is in man on the #2, it is also very effective at attacking bubble screens. The downside of Bracket is that it forces your safety to become the primary run defender (instead of the Apex) to that side of the field.

2) Switch (Triangle Coverage)
- Corner – Man-to-man on #1.
- Apex – Man-to-man on #2.
- Safety – Bracket #2 except when #2 is under or out short, then work to bracket #1.
- Hook – Take any #3 that will not be covered by the CB, Apex, or Safety. If no uncovered #3, then defend the hook area deep to short.
In short-yardage or Red Zone type situations, Smart will turn to Switch against any 2-detached.
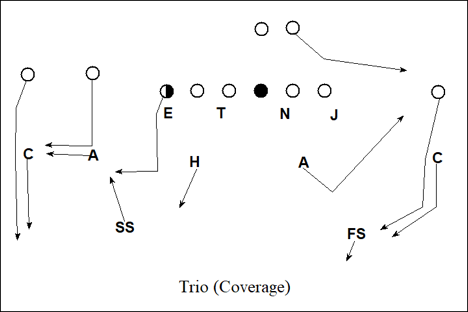
3) Trio
- Strong Corner – Align based on down and distance. MEG on #1.
- Strong Apex – Take first out of #2/#3. If no out, then have #2 vertical. If neither #2/#3 is out and #2 is not vertical (e.g., running under), then zone to curl.
- Hook – Take first in of #2/#3. If no in, then have #3 vertical. If neither #2/#3 is in and #3 is not vertical (e.g., running out), then zone to hook.
- Strong Safety – Play 2nd in/2nd out of #2/#3. If none, then zone deep to split the difference between #2 and #3.
- Weak Apex – Depends on call to backside.
- If Meg, Cone, Dog, or Tuff to backside: Take any #2 weak. If no #2 weak, then take first crosser.
- If Cut to backside: Man on #2 for everything except when #2 goes out to the flat, and then rob #1.
Trio is primarily a red zone coverage that allows the front side to effectively handle quick outs or in routes by the #2 and #3. I have only seen Smart use it when backed up into the red zone, though I would not be surprise to see Georgia run it a short-yardage situation at some point.
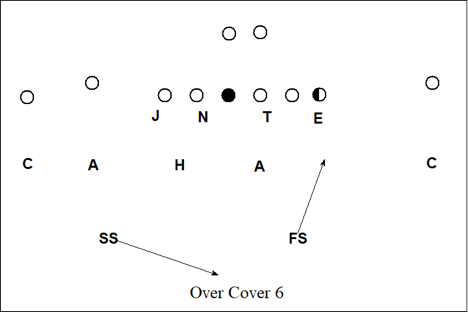
B. Over Front – One-High Base Calls
Smart is surprisingly straightforward in his one-high safety calls from an Over front. His main play is to run pattern-matching Cover 6 (Cover 3 with the safety away from the passing strength coming down).
Smart’s second and less common call is to run Cover 1 Robber with the safety away from the tight end – regardless of passing strength – coming down.
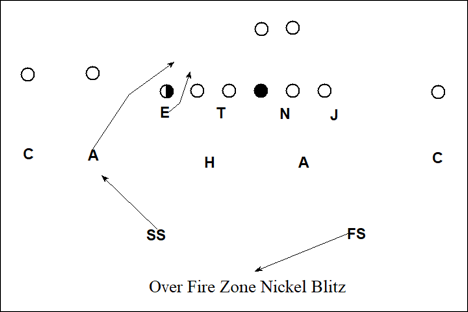
C. Over Front – Common Blitzes
Smart has a lot of blitzes from his Over front package, but there are several primary blitzes that Smart leans on the most. Perhaps unsurprisingly, many of these same blitzes are run by Brent Venables at Clemson as well.
The first is your standard nickel Fire Zone blitz, where the Apex over the slot receiver rushes from the outside.
The second is a weak safety blitz that is particularly apt at taking offensive lines by surprise.
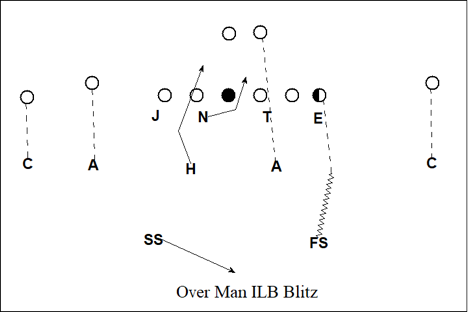
The third is your standard “send the Mike and play man” concept. Smart will change up which gap the Mike will attack, and occasionally run this with 2-man defensive line stunts thrown in as well.
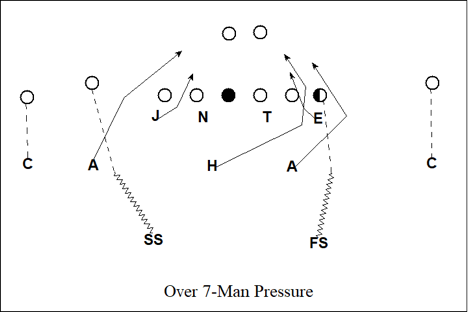
The fourth blitz is a 7-man pressure with purely man coverage, which Smart liked to run on third down. Each Apex player has a “Green Dog” responsibility on this play, meaning that are to peel off from their pressure if and only if the running back flares out for a route to their side.
The fifth blitz is a double A-Gap blitz with Hot coverage behind it, as diagramed above at the end of the Tite front section.
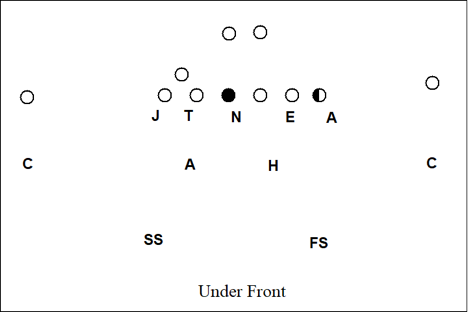
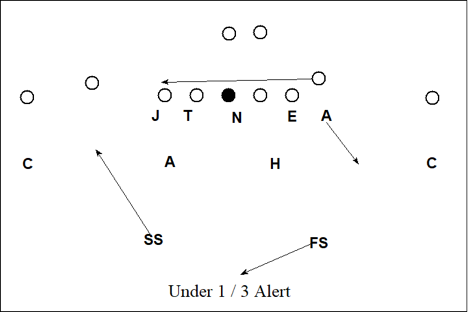
IV. Under Front
The Under front is Smart’s go-to front against 21 or 12 offensive personnel. It would show up occasionally against smashmouth spread offenses that trotted out three receivers, but this was the exception.
Smart is a firm believer in running what Saban calls 1 Alert and 3 Alert (each being a form of Cover 1 Robber and pattern match Cover 3 respectively). The “Alert” tag means that the down safety will always be to the side wherever the fullback or H-back is going. So if the fullback/H-back is on the right and stays there, then the safety on the right side will come down to play the Apex. And if the fullback/H-back is on the right and heads to the left side, then the safety on the left side will come down to play the Apex.
If the offense showed 2 detached (e.g., a TE in the slot), then Smart tended to run Mod or Bracket to the 2 detached side with Cut opposite, with some Cover 1 and Cover 3 mixed in.
V. Even Front
Historically, Saban would employ an Even front against many spread offenses to combat the run by filling both B-Gaps and daring his opponent to try to force the ball through the open A-Gaps. Smart, after leaving Alabama, appears to use the Even front primarily on passing downs and mixes in a large number of blitzes and stunts.
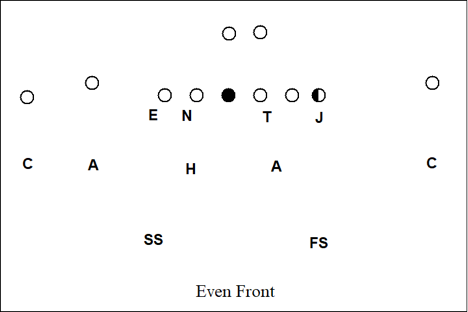
I did not have enough film of Georgia’s Even front to really glean a clear set of distinct plays. What I will say is that if Georgia’s running it, expect either: (i) deep coverage by the safeties (whether Cover 5 or Mod) with a lot of stunts thrown in, or (ii) really aggressive blitzing. In short, this appears to be a passing down-only front for Smart.
Conclusion
In many ways, I think of Kirby Smart as one of the leading edges in where college defenses are headed: utilizing both 3- and 4-man fronts, and playing several different varieties of Quarters along with Cover 3 Match and Cover 1 Man. And while most defensive coaches will espouse how their defense will be multiple but rarely are in game, Smart truly lives up to this principle he spouts a press conferences and coaching clinics. In many ways, Smart does not see predictability simply as a mistake, but a symptom of an even greater sin: complacency.
And as long as he continues to live by that principle – one he undoubtedly learned from his old boss – Smart and Saban promise to be the greatest non-divisional rivalry in college football for many years to come.